How to make a bird feeder from a coconut
You
are at: [Jaspell Website -Home] >
[Useful Hints – How to make a bird feeder from a coconut] [Go up ⇗]
[Contact Us!]
The Jaspell
bird feeder is attracting many sparrows, robins, blue tits, great tits, wrens,
and blackbirds that come for the suet and mealworm pellets. Our busy feeders
are visible from our kitchen-diner and give us—and the birds—enormous pleasure.
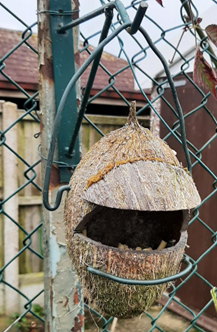
Figure 1 - (Photo) Hooded bird feeder from a coconut
Why use this design when
there are also many other designs for bird feeders made from a coconut? Jaspell’s design is engineered so that:
·
Its
hood and U-shaped hanging wire limit both ingress of rain.
·
Its
hanging wire prevents the feeder from spinning.
·
Its
mouth is shaped to counteract spillage and allow birds up to the size of blackbirds easy access.
·
Its
simple perch is sufficient for birds paying a brief visit.
The cost? Just over
£1. The birds now prefer this low-cost homemade device instead of all the
other purchased feeders we’ve been using for decades!
All you need is:
·
An
empty coconut shell;
·
Some
bendable 3mm thick coated wire—one piece 330mm long
and one 125mm long;
·
Exterior
glue (slightly expanding polyurethane adhesive is serving us well)
·
Hacksaw;
·
Drill
and 5mm twist drill bit
·
Pliers
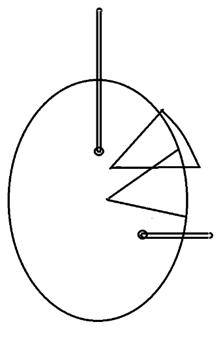
Figure 2 - (Diagram, side view) Hooded bird feeder from a coconut
1. Follow the diagram and
photograph.
2. Carefully saw out a segment of
the coconut shell and save this to be the hood.
3. Drill one or two drainage holes
gently in the soft indentations at the bottom of the shell.
4. Drill two holes large enough for
the hanging wire to fit through freely.
5. Drill two holes to hold the perch
wire.
6. Take the perch wire and at each
end bend the last 10mm up vertically at 90°to form anchorages.
7. At each end of the perch wire
allow 15mm horizontally in from these turn-ups before bending the remainder at
90° horizontally.
8. Bend the middle section of the
perch wire in the form of a horizontal curve that matches the surface of the
shell.
9. Fit the ends of the perch wire
through each side of the shell with the ends pointing upwards.
10. Now take the hanging wire and bend
the last 10mm up at 90° to form anchorages.
11. At each end of the hanging wire
allow 15mm horizontally in from these turn-ups before bending the remainder at
90° vertically downwards and then upwards again to form a 20mm deep U-shaped
drip.
12. Bend the middle part of the
hanging wire in a gentle curve but with a kink at the centre.
13. Fit the ends of the hanging wire
through the holes each side of the shell with the ends pointing upwards.
14. Check that the ends of both wires
are bent up sufficiently inside the shell to be clear of the movements of the
birds.
15. To make the hood, take the shell
segment that was cut out and hold it upside down from how it was. Find the best
position for it to serve as a hood above the opening in the shell. Mark the
position on the shell, and note the narrow gap that will need filling during
gluing.
16. Glue the hood in place. Hold it
in place until sufficiently set while ensuring that any gaps are filled. A
small ridge of glue can also be extended beyond the corner of the hood to the
corner of the opening to further deflect rain.
17. Fill the shell with suet pellets
or other bird feed, and hang it up in a safe place.
Best wishes,
Jasper &
Ellen Burford for
Jaspell
[Go up ⇗]
Date
of last edit: 23 March, 2026